How Do Push-to-Connect Fittings Work?
How Do Push-to-Connect Fittings Work? Understanding the Three Key Internal Components
-
20 Feb, 2025

-

How Do Push-to-Connect Fittings Work? Understanding the Three Key Internal Components
LEANYEE Technical Insights · Pneumatic Systems Series
Introduction: How Can a Push-to-Connect Fitting Lock with One Push and Release with One Press?
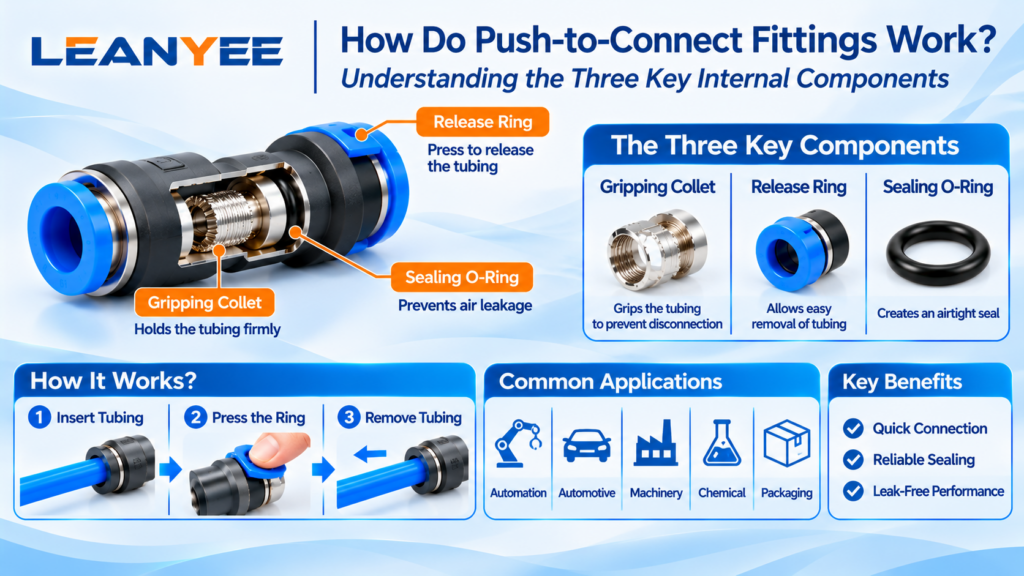
The ability of a push-to-connect fitting to lock when the tubing is inserted and release when the release ring is pressed depends on three key internal components: the gripping collet, release ring, and sealing O-ring.
Understanding these three components helps explain common problems such as tubing that will not insert properly, tubing that cannot be removed, and air leakage after connection.
What Does Each of the Three Components Do?
The gripping collet is a stainless steel spring component inside the fitting. It yields as the tubing is inserted and grips the tubing more firmly when the tubing is pulled in the opposite direction. Its primary function is to prevent the tubing from disconnecting.
The release ring is located on the outermost part of the fitting. Pressing it opens the gripping collet, releasing its grip and allowing the tubing to be removed.
The sealing O-ring grips the outer surface of the tubing to create an airtight seal and prevent leakage.
These three components work together to provide quick, tool-free connections.
Therefore, when tubing cannot be removed, the problem is not necessarily that it is jammed. The gripping collet may simply not have been released. When a connected fitting leaks, the O-ring may be scratched, damaged, or aged.
The tubing’s outside diameter tolerance, surface scratches, and burrs on the cut end can all directly affect how these three components work together.
Comparison of the Three Key Components
| Comparison Item | Gripping Collet | Release Ring | Sealing O-Ring |
|---|---|---|---|
| Function | Grips the outside of the tubing to prevent disconnection | Opens the gripping collet to release the tubing | Seals against the tubing surface to prevent air leakage |
| Common Materials | Stainless steel spring component | Engineering plastic or metal | Nitrile rubber (NBR) or fluoroelastomer (FKM) |
| Typical Failure Symptoms | Tubing disconnects or cannot be gripped securely | Tubing cannot be pulled out or removed | Slow leakage or air seepage |
| Maintenance Tips | Avoid pulling the tubing forcibly, which may deform the collet | Press the release ring fully during disconnection | Replace the O-ring when it becomes aged or deteriorated |
Understanding the Structure Is Not Enough — Common Problems in Real-World Applications
1. Insert the tubing fully until it clicks into place.
Partially inserted tubing is a common cause of air leakage and tubing disconnection.
2. Press the release ring before pulling out the tubing.
Pulling the tubing out forcibly can damage the gripping collet and scratch the tubing surface.
3. Cut the tubing end squarely and remove any burrs.
Angled cuts and burrs can scratch the sealing O-ring, creating a potential source of slow air leakage.
4. Protect the sealing O-ring from high temperatures and oil contamination.
For demanding operating conditions, select an appropriate sealing material rather than relying on ordinary nitrile rubber (NBR) when it is unsuitable for the application.
When disconnecting a push-to-connect fitting, do you press the release ring first, or do you pull the tubing out forcibly? Share your experience in the comments.
Frequently Asked Questions (FAQ)
Q1: Why Are Some Push-to-Connect Fittings Easy to Insert and Remove, While Others Are Very Difficult to Operate?
There are usually three possible reasons.
1. The tubing is out of tolerance or has surface damage or contamination.
If the tubing’s outside diameter is outside the specified tolerance, or its surface has scratches or oil contamination, the gripping collet may not engage properly.
2. The tubing end is not cut squarely or has burrs.
An uneven cut or burrs can interfere with the sealing O-ring as the tubing is inserted.
3. The fitting size does not match the tubing diameter.
Using an incompatible fitting and tubing combination can make insertion and removal difficult.
How to troubleshoot the problem:
Replace the tubing with a piece that has the correct outside diameter and an undamaged surface. Use a tubing cutter to make a square cut and remove any burrs. Insert the tubing straight into the fitting until you hear or feel it click into place.
If the problem persists, check whether the fitting size is correct and whether dirt or other foreign matter is obstructing the internal components.
Refer to the manufacturer’s product catalog for material specifications and dimensional tolerances.
Keeping one or two sets of commonly used fitting sizes available for comparison can also help speed up troubleshooting.
Q2: How Should You Choose the Material for a Sealing O-Ring?
The sealing material should be selected according to the working medium and operating temperature.
1. Nitrile rubber (NBR)
For compressed air applications at normal temperatures, NBR is generally suitable and offers a good balance between cost and performance.
2. Fluoroelastomer (FKM)
For high-temperature applications or applications involving oil and certain chemical media, FKM may be a better choice because of its improved temperature and chemical resistance.
3. Materials suitable for food processing and cleanroom applications
For food-processing and cleanroom environments, select sealing materials that comply with the applicable hygiene and cleanliness requirements.
Choosing the wrong material may cause the O-ring to harden prematurely, swell, or crack, resulting in slow air leakage.
Always check the manufacturer’s sealing material compatibility chart to confirm compatibility with the working medium and operating temperature.
If the working medium is uncertain, prioritize a material with an appropriate corrosion and chemical resistance margin, subject to the manufacturer’s compatibility data.
Q3: Does Air Leakage from a Push-to-Connect Fitting Always Mean the O-Ring Is Damaged?
No. The first step is to locate the leakage point, for example, by using soapy water where appropriate.
1. Leakage where the tubing enters the fitting
Possible causes include an aged or damaged O-ring, scratches on the tubing surface, or damage to the sealing surface.
2. Leakage at the threaded connection
This may be caused by an incompatible thread type, incorrect thread engagement, or improper application of PTFE thread seal tape. It is not necessarily related to the O-ring.
3. Leakage caused by incorrect tubing installation
The tubing may not have been inserted fully, or burrs on the cut end may have scratched the sealing surface.
Therefore, do not replace the entire fitting immediately. Locate the leakage point first, then address the actual cause.
If the O-ring is confirmed to be aged or damaged, replace it with a component of the correct specification. After replacement, recheck the connection under operating pressure and verify the result through on-site testing.
Do not replace components based on assumptions alone. Identifying the leakage point before taking action can save both time and money.
Q4: If the Gripping Collet Cannot Hold the Tubing and the Tubing Pulls Out Easily, Is the Fitting Defective?
Check the tubing before assuming that the fitting is defective.
If the tubing’s outside diameter is too small, its surface is excessively smooth or scratched, or it is contaminated with oil, the gripping collet may not hold it securely.
Tubing that has not been fully inserted may also appear to be locked when it is not actually secured.
If the tubing is in good condition, inspect the gripping collet for deformation or loss of spring force caused by repeated forceful pulling.
Once the gripping collet has been deformed and can no longer grip the tubing securely, the fitting must be replaced.
How to prevent the problem:
Follow the correct connection and disconnection procedure: insert the tubing fully, press the release ring before removal, and never pull the tubing out forcibly.
For workstations where tubing disconnection occurs frequently, consider switching to metal compression fittings if they are suitable for the application.
During routine inspections, pay attention to the feel of tubing insertion and removal. If the connection becomes noticeably looser, it may be an early warning sign of a problem.
Q5: Can Push-to-Connect Fittings Be Used in Vacuum Systems?
Standard push-to-connect fittings are generally designed for positive-pressure applications and should not automatically be assumed suitable for vacuum service.
In a vacuum system, pressure acts differently: air is drawn inward toward the lower-pressure area. A standard fitting’s sealing structure may not provide adequate sealing under negative pressure, potentially resulting in air leakage.
Vacuum systems should use vacuum-rated push-to-connect fittings with sealing and tubing-retention structures designed for negative-pressure applications.
You should also confirm that the fitting’s flow passage is suitable for the required vacuum level and pumping speed.
For occasional, low-vacuum suction applications, first check whether the manufacturer’s product catalog explicitly states that the fitting is suitable for vacuum service.
For continuous vacuum operation, always use fittings specifically designed for vacuum applications and verify their sealing performance under actual operating conditions.
Vacuum systems can be highly sensitive to leakage, so actual testing is essential to confirm that the required vacuum level can be achieved and maintained.
Technical Disclaimer
The fitting selection recommendations, thread specifications, and technical parameters described above are based on current international standards, including ISO 4414 (Pneumatic fluid power — General rules and safety requirements), ISO 8573 (Compressed air quality), and ISO 6358 (Flow characteristics), as well as thread standards ISO 7-1, ISO 228-1, and ANSI/ASME B1.20.1, together with publicly available technical information from international manufacturers such as SMC, Festo, and Parker.
This information is provided for reference purposes only.
Actual performance may be affected by cylinder bore size, load, operating pressure, temperature, tubing layout, and other factors. On-site testing and commissioning are recommended. Always refer to the product catalog and confirm the technical parameters with the manufacturer before making a final selection.
LEANYEE Technical Team
More News & Insights
-
Leanyee
 29 Oct, 2026Pneumatics in Electronics CleanroomsPneumatics in Electronics and Semiconductor Cleanrooms: Cleanliness and ESD ProtectionRead Article
-
Leanyee
 22 Oct, 2026Pneumatics in Automotive Welding LinesPneumatics in Automotive Welding Lines: Clamping, Location, and Spatter ResistanceRead Article
-
Leanyee
 15 Oct, 2026Pneumatics for Food and Beverage LinesPneumatics on a Food and Beverage Line: Oil-Free, Hygienic, Washdown-ReadyRead Article