A Guide to Connecting and Disconnecting Quick-Connect Fittings
How to Remove and Install Push-In Pneumatic Fittings Correctly: A Complete Guide
-
06 Mar, 2025

-

How to Remove and Install Push-In Pneumatic Fittings Correctly: A Complete Guide
LEANYEE Technical Guide | Pneumatic Systems Series
Introduction
Is your pneumatic tube difficult to remove from a push-in fitting? Does it become damaged during removal, or does the connection start leaking after you reconnect it?
In many cases, the problem is not poor fitting quality. Instead, it comes from misunderstanding how the fitting’s internal gripping mechanism and release ring work.
The basic rule is simple: push the tube all the way in until it clicks, and press the release ring before pulling the tube straight out. Pulling the tube forcefully without releasing the gripping mechanism can scratch the tube, damage the internal gripping components, and cause air leakage.
Understanding the structure of a push-in fitting and following the correct installation and removal procedures can help prevent unnecessary damage and improve the reliability of pneumatic connections.
1. How Does a Push-In Pneumatic Fitting Grip the Tube?
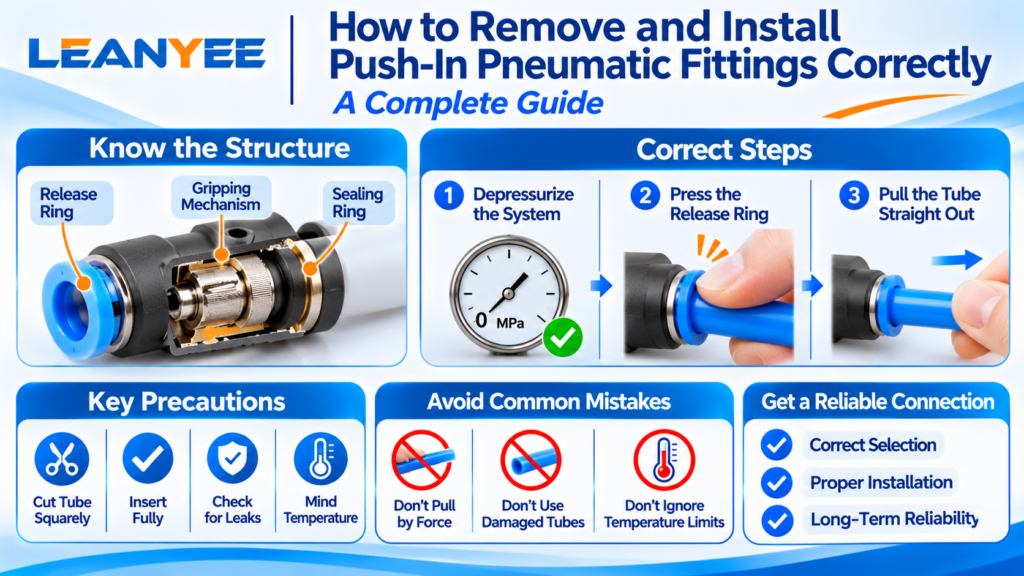
A typical push-in pneumatic fitting contains three important components: a gripping mechanism, a release ring, and a sealing ring. Each component has a specific function.
1.1 Gripping Mechanism: Preventing the Tube from Coming Loose
The gripping mechanism typically consists of a spring-like metal collet, often made of stainless steel. Its purpose is to grip the outer surface of the tube and prevent it from being pulled out.
When the tube is inserted, the gripping mechanism allows it to move inward. When the tube is pulled outward without releasing the mechanism, the gripping teeth engage more firmly with the tube surface.
This is why pulling harder does not necessarily make removal easier. Instead, the gripping mechanism may hold the tube even more tightly.
1.2 Release Ring: Unlocking the Gripping Mechanism
The release ring is the outer ring surrounding the tube entry point.
When the release ring is pressed inward, it acts on the gripping mechanism and allows the tube to be released.
To remove the tube correctly, press the release ring fully and evenly while pulling the tube straight out.
If the release ring is only touched or pressed insufficiently, the gripping mechanism may remain engaged, making the tube difficult to remove.
1.3 Sealing Ring: Preventing Air Leakage
The internal sealing ring fits around the tube’s outer surface and prevents air from leaking through the connection.
If the tube surface is scratched, the tube end is deformed, or the internal sealing ring is damaged, the connection may no longer seal properly.
This explains why a tube may be easy to install initially but start leaking after repeated removal and reconnection.
1.4 Why Is the Tube Sometimes Difficult to Remove?
A tube that cannot be removed is not necessarily stuck permanently. In many cases, the gripping mechanism has simply not been released.
Several conditions can make removal more difficult:
- The release ring has not been pressed far enough.
- The tube end is cut at an angle.
- Burrs remain on the tube end.
- The tube outer diameter is outside the specified tolerance.
- The gripping mechanism has engaged unevenly with the tube surface.
Correct tube preparation and proper use of the release ring are essential for smooth installation and removal.
2. Correct Removal vs. Pulling the Tube by Force
The difference between correct removal and forceful pulling can directly affect the condition of both the tube and the fitting.
| Comparison | Correct Removal: Press the Release Ring | Incorrect Removal: Pull by Force |
|---|---|---|
| Removal method | Press the release ring, then pull the tube straight out | Pull the tube directly without unlocking the gripping mechanism |
| Effect on the tube | Minimizes damage and may allow reuse if the tube remains in good condition | Can scratch the tube wall and deform the tube end |
| Effect on the fitting | Helps preserve the gripping mechanism and sealing ring | May deform the gripping mechanism or damage the sealing ring |
| Result | Smoother removal and a lower risk of leakage | Increasing damage, leakage, and possible fitting replacement |
The correct procedure is not only easier but also helps protect the connection’s sealing and gripping components.
Forceful pulling, by contrast, can turn a simple maintenance task into an unnecessary replacement job.
3. Four Important Precautions When Removing and Installing Push-In Fittings
Understanding the fitting’s structure is only the first step. Proper operating procedures are equally important.
3.1 Release the Pressure Before Removing the Tube
Always depressurize the pneumatic system before removing a tube.
Pulling a tube while the system is pressurized can be dangerous. The pressure may also make removal more difficult.
Before starting work:
- Stop the relevant equipment according to the applicable maintenance procedure.
- Isolate the air supply where required.
- Exhaust the trapped compressed air and confirm that the relevant section is depressurized.
- Only then begin removing the tube.
Follow the equipment manufacturer’s safety instructions and the site’s lockout and isolation procedures where applicable.
3.2 Cut the Tube Squarely and Insert It Fully
Proper tube preparation helps the gripping mechanism and sealing ring work as intended.
Use a suitable tube cutter to make a straight, perpendicular cut. Remove burrs and ensure that the tube end is clean and undamaged.
Then insert the tube straight into the fitting until it reaches the required insertion position. A click may be heard, depending on the fitting design.
After insertion, gently pull the tube to confirm that the gripping mechanism has secured it.
An angled cut, burrs, or incomplete insertion may result in poor gripping or sealing.
3.3 Press the Release Ring Fully
Simply touching the release ring is not enough. It must be pressed sufficiently to disengage the gripping mechanism.
Use your fingers or a suitable tool to press the outer ring evenly, then pull the tube straight out.
Avoid pulling the tube at an angle or applying excessive force while the gripping mechanism remains engaged.
If the tube still cannot be removed, inspect the tube end and fitting for burrs, deformation, or excessive gripping. Do not immediately resort to pliers or forceful pulling.
3.4 Repeated Removal Can Wear the Tube
Repeatedly inserting and removing a tube at the same location can leave scratches on its outer surface.
These marks are produced by the gripping mechanism. Over time, the scratched areas may become potential leakage points because the sealing ring may no longer make reliable contact with the tube surface.
For workstations that require frequent disconnection and reconnection, trim off the previously marked section of the tube before reconnecting it, provided sufficient tube length remains.
Inspect the tube surface regularly and replace damaged sections when necessary.
4. Frequently Asked Questions About Push-In Fitting Removal and Installation
Q1: What Should I Do If a Tube Is Stuck in a Push-In Fitting?
First, depressurize the system and exhaust the compressed air. Removing a tube under pressure can be dangerous and may make removal more difficult.
Then follow these steps:
- Locate the release ring around the tube entry point.
- Press the release ring evenly using your fingers or a suitable small tool.
- Make sure the ring is pressed far enough to release the gripping mechanism.
- Hold the tube and pull it straight outward gently.
If the tube still cannot be removed, check whether the tube end has burrs, an angled cut, or deformation that may interfere with the gripping mechanism. The tube may also be held very tightly by the gripping teeth.
Do not pull forcefully or use pliers to drag the tube out. Doing so can scratch the tube wall and damage the gripping mechanism.
If removal remains impossible, one option is to cut the tube near the fitting, preserving the fitting itself, and then prepare a new tube end for reconnection.
After removal, inspect the fitting and tube before reuse. Replace damaged components as necessary.
Q2: Why Does the Connection Leak After I Remove and Reconnect the Tube?
This often happens because the previous removal or installation damaged the contact surfaces between the tube and fitting.
There are three common causes.
1. Scratches on the tube surface
The gripping mechanism may leave scratches on the tube. These damaged areas can prevent the sealing ring from maintaining an effective seal.
2. A deformed tube end
Pulling the tube forcefully can deform its end. An uneven cut or remaining burrs can also interfere with proper insertion and sealing.
3. Damage to the internal sealing ring
The sealing ring inside the fitting may have been scratched or otherwise damaged during removal or reconnection.
To solve the problem:
- Cut off the scratched or deformed section of the tube.
- Use a suitable tube cutter to make a straight, perpendicular cut.
- Remove burrs and inspect the tube end.
- Insert the tube fully until it reaches the proper position; a click may be heard, depending on the design.
- If leakage continues after replacing the damaged tube section, inspect the gripping mechanism and sealing ring. Replace the fitting with a new one of the same specification if these components are damaged.
After reassembly, perform an appropriate leak test under the actual operating conditions, following the applicable safety procedures.
Q3: How Many Times Can a Push-In Fitting Be Disconnected and Reconnected? Does It Have a Service Life?
Yes. Push-in fittings have a finite service life, and their components are not designed to withstand unlimited repeated use.
Repeated engagement can cause elastic fatigue in the gripping mechanism. The sealing ring may also wear or deteriorate over time.
The tube itself can also be damaged. When the gripping mechanism repeatedly engages the same section of tubing, it may leave circular scratches on the outer surface. As the damage accumulates, the risk of leakage increases.
For workstations requiring frequent disconnection and reconnection, consider the following practices:
- After removal, trim off the previously marked section of tube before reconnecting it, when sufficient tube length is available.
- Inspect the tube surface for scratches and deformation.
- Replace the fitting if the sealing ring shows signs of deterioration.
- Replace the fitting if the gripping mechanism is deformed.
- Pay attention to changes in insertion and removal feel. A noticeably loose grip may indicate wear or damage.
There is no single service-life figure that applies to every push-in fitting. The actual number of permissible connection cycles and the replacement criteria should be determined using the manufacturer’s product documentation, together with the application conditions and frequency of use.
Q4: Can Push-In Fittings and Tubes From Different Brands Be Used Together?
Components with the same nominal size, such as an 8 mm fitting and an 8 mm tube, may physically fit together. However, this does not automatically guarantee a reliable connection.
Different manufacturers may use different gripping mechanisms, sealing materials, and internal dimensional tolerances. Mixing components may result in:
- Insufficient gripping force.
- Difficult tube removal.
- Minor or intermittent air leakage.
- Reduced connection reliability.
The tube itself also matters. Polyurethane (PU) tubing and nylon tubing can differ in actual outer diameter, hardness, and dimensional tolerances. These differences may affect how the gripping mechanism engages with the tube.
In ordinary applications, mixing compatible products may sometimes work. However, for high-vibration environments, safety-critical applications, or important production stations, using fittings and tubes from the same manufacturer as a matched combination is generally preferable.
When compatibility is uncertain, consult the manufacturer’s compatibility tables and verify the assembled connection under the actual operating pressure and conditions.
Q5: Can Push-In Fittings Be Used in Vacuum, High-Pressure, or High-Temperature Applications?
Ordinary push-in fittings are generally designed for positive-pressure pneumatic applications, often at rated pressures of approximately 1.0 MPa or below and within normal-temperature operating ranges. These are general reference conditions, not universal ratings for every product.
Using an ordinary push-in fitting in a specialized environment without checking its specifications can create reliability and safety risks.
For vacuum applications:
Vacuum systems require suitable sealing performance under negative pressure. Select dedicated vacuum-rated push-in fittings and confirm the manufacturer’s specified vacuum rating.
For high-pressure applications:
Check the fitting’s rated pressure and ensure it meets the system’s maximum operating pressure with an appropriate safety margin. If the operating conditions exceed the fitting’s specifications, select a fitting with a suitable rating, such as an appropriately specified metal compression fitting.
For high-temperature applications:
Confirm the rated temperature of the fitting body and sealing components. If the operating temperature exceeds the specified range, select a fitting designed for the required conditions.
For special media or corrosive environments:
Sealing material is also important. Standard nitrile rubber may not withstand high temperatures or certain chemical media. Depending on the application, consider compatible materials such as fluorocarbon rubber (FKM).
Always select fittings according to the manufacturer’s rated pressure, temperature, and media compatibility data, and verify their suitability under actual operating conditions.
5. Best Practices for Maintaining Push-In Pneumatic Fittings
Correct removal and installation procedures can help extend the useful service life of pneumatic tubing and fittings.
The following practices are particularly important for industrial pneumatic systems:
- Always depressurize the system before removing tubing.
- Press the release ring fully before pulling the tube out.
- Avoid forceful pulling that can damage the tube and gripping mechanism.
- Cut tube ends squarely and remove burrs before installation.
- Insert the tube fully and confirm that the gripping mechanism has secured it.
- Inspect the tube for scratches after repeated disconnection.
- Trim off damaged sections of tubing before reconnection when appropriate.
- Replace worn sealing rings or damaged fittings.
- Use compatible tubing and fittings, preferably as a matched combination for critical applications.
- Verify that the fitting is suitable for the system’s pressure, temperature, medium, and vacuum requirements.
These measures can reduce avoidable leakage, minimize component damage, and make routine maintenance more efficient.
Conclusion
When a tube becomes difficult to remove from a push-in fitting, pulling harder is rarely the right solution.
The fitting’s gripping mechanism is designed to hold the tube securely, while the release ring allows that mechanism to disengage. Pressing the release ring before pulling the tube straight out is the key to correct removal.
Proper tube preparation, complete insertion, pressure release before maintenance, and regular inspection are equally important. Repeated disconnection can damage tubing and wear fitting components, so damaged sections should be removed and worn fittings replaced when necessary.
Remember three basic rules: depressurize before removal, press the release ring before pulling, and insert the tube fully during installation. Following these practices can help prevent leakage, reduce unnecessary replacement costs, and improve the reliability of pneumatic connections.
How do you usually remove a tube from a push-in fitting in your workshop? What causes the most trouble: a stuck tube, a damaged tube end, or leakage after reconnection? Share your experience with us.
Technical Disclaimer
The descriptions of push-in fitting structure, removal and installation procedures, and operating parameters in this article are based on the original technical material and general pneumatic industry references, including relevant ISO standards and publicly available technical information from manufacturers such as SMC and Festo.
This article is intended for general technical reference only. Actual removal, installation, and sealing performance may be affected by pressure, temperature, vibration, tube dimensional tolerances, materials, and other operating conditions. Always follow the manufacturer’s product documentation and confirm the applicable technical parameters. Verify the connection under actual operating conditions and follow appropriate safety procedures.
LEANYEE Technical Team
More News & Insights
-
Leanyee
 29 Oct, 2026Pneumatics in Electronics CleanroomsPneumatics in Electronics and Semiconductor Cleanrooms: Cleanliness and ESD ProtectionRead Article
-
Leanyee
 22 Oct, 2026Pneumatics in Automotive Welding LinesPneumatics in Automotive Welding Lines: Clamping, Location, and Spatter ResistanceRead Article
-
Leanyee
 15 Oct, 2026Pneumatics for Food and Beverage LinesPneumatics on a Food and Beverage Line: Oil-Free, Hygienic, Washdown-ReadyRead Article