Troubleshooting Air Leaks and Tube Disconnection in Pneumatic Fittings
Pneumatic Fittings Keep Leaking or Tubing Keeps Coming Loose? A Step-by-Step Troubleshooting Guide
-
14 Mar, 2025

-

Pneumatic Fittings Keep Leaking or Tubing Keeps Coming Loose? A Step-by-Step Troubleshooting Guide
LEANYEE Technical Guide · Pneumatic Systems Series
The Key Takeaway
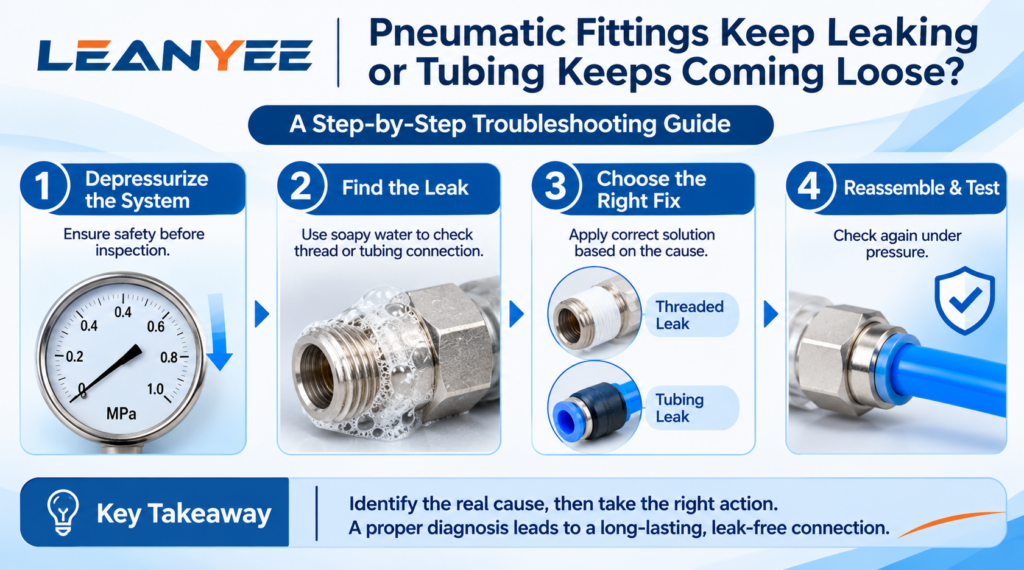
When a pneumatic fitting leaks or tubing keeps coming loose, do not rush to replace the component. First, identify the exact leak location and address the underlying cause.
Follow this troubleshooting sequence:
- Depressurize the system and prepare for a safe inspection.
- Locate the leak using soapy water to determine whether it comes from the threaded connection or the tubing-to-fitting interface.
- Choose the correct corrective action based on the type and location of the leak.
- Reassemble the connection and perform a pressurized leak test to verify the result.
Replacing components without identifying the root cause often treats the symptom rather than solving the actual problem.
The Two Main Categories of Pneumatic Fitting Leaks and Disconnections
Most pneumatic fitting leaks fall into two main categories: threaded connection leaks and tubing connection leaks.
1. Threaded Connection Leaks
Leaks at threaded connections may result from:
- An incompatible thread type or incorrect thread matching.
- Improper application of PTFE thread seal tape or thread sealant.
- A worn or aged O-ring.
- Insufficient tightening.
The correct solution depends on the actual cause. Simply tightening the fitting further may not solve the problem if the thread type is incorrect or the sealing component is damaged.
2. Tubing Connection Leaks
Leaks at the tubing connection of a push-in fitting may be caused by:
- The gripping collet failing to grip the tubing securely.
- An aged or damaged internal sealing ring.
- Tubing that has been cut at an angle.
- Tubing with an outside diameter outside the specified tolerance.
3. Why Does Tubing Come Loose?
Tubing disconnection is often associated with inadequate gripping by the fitting’s collet. Common causes include tubing with an incorrect outside diameter, scratches on the tubing surface, or tubing that has not been inserted fully.
Correctly identifying the problem is essential for effective troubleshooting. ISO 4414 provides general requirements for pneumatic system safety and maintenance and can be used as a reference when inspecting connections and verifying repairs.
Threaded Connection Leaks vs. Push-In Fitting Leaks
| Comparison Item | Threaded Connection Leak | Tubing Connection Leak (Push-In Fitting) |
|---|---|---|
| Leak location | At the thread engagement | At the interface between the tubing and fitting |
| Common causes | Incorrect thread type, insufficient sealing material, or an aged O-ring | Collet not gripping properly, aged sealing ring, or tubing cut at an angle |
| Inspection method | Apply soapy water around the threaded connection | Apply soapy water around the tubing entry point and gently check whether the tubing is secure |
| Corrective action | Reapply sealing tape or sealant as appropriate, replace the O-ring, or correct the thread mismatch | Rec ut the tubing and reinsert it correctly, or replace the fitting if it is damaged |
Knowing How to Troubleshoot Is Not Enough: Common Problems in the Field
1. Depressurize the System Before Leak Inspection
Always follow safe procedures before inspecting a pneumatic connection. Do not skip the leak-detection process using soapy water.
Inspecting a pressurized system carelessly can be dangerous and may make it difficult to identify the precise leak location. Depressurize the system before handling or disassembling fittings, and use an appropriate, controlled procedure when pressure must be applied for leak testing.
2. Do Not Focus Only on the Fitting
The tubing itself can be the source of a leak.
Scratches, surface damage, or an incorrect outside diameter can prevent the tubing from sealing properly inside a push-in fitting. Air may escape around the damaged section even when the fitting body is still in good condition.
During troubleshooting, inspect both the fitting and the tubing rather than assuming the fitting is always responsible.
3. Pay Special Attention to Connections Exposed to Vibration
Vibration can increase the likelihood of connection problems. It may accelerate wear of the sealing ring in a push-in fitting or contribute to loosening at threaded and compression-type connections.
Where vibration is significant, secure the tubing with suitable tube clamps or supports to reduce movement and mechanical stress at the fitting.
4. Always Recheck the Connection Under Pressure
After completing the repair, perform another leak test under appropriate operating conditions.
A fitting is not considered successfully repaired simply because it has been retightened or reassembled. Verify that no leakage remains before returning the equipment to normal service.
Frequently Asked Questions (FAQ)
Q1: If I Do Not Have Soapy Water, How Can I Quickly Find an Air Leak?
Soapy water is one of the most commonly used methods for detecting air leaks. If it is unavailable, the following methods may help identify the approximate location of a noticeable leak:
Method 1: Listen for escaping air.
Move close enough to the suspected connection to listen for a hissing sound. This can help narrow down the location of a leak.
Method 2: Check for a cooling sensation.
The original guide suggests wetting a finger with water and carefully checking the suspected area for a cooling sensation or a sensation of escaping air. This method is only an approximate indicator and should not replace a proper leak test.
Method 3: Use a tissue or thin strip of paper.
Hold a lightweight tissue or thin strip of paper near the suspected leak. Escaping air may cause it to move, helping you identify the approximate location.
These methods are more suitable for noticeable leaks. For very small leaks, soapy water or a dedicated leak-detection solution is generally preferable.
Safety note: Follow the appropriate depressurization and pressure-control procedures during inspection. Do not place your fingers near hazardous moving components or use your hands to check high-pressure leaks. Always confirm the result with a proper leak test under safe operating conditions.
Q2: Why Does a Fitting Start Leaking Again a Few Days After Being Tightened?
If a fitting starts leaking again several days after tightening, three common causes should be considered.
1. Improperly applied sealing tape or sealant
The connection may initially appear sealed, but vibration or changes in operating conditions can compromise the sealing material.
2. Aged or deteriorated sealing components
An O-ring or other sealing ring may temporarily seal when compressed, but continued deterioration can cause leakage to return.
3. Thermal expansion, contraction, or pressure fluctuations
Changes in temperature or operating pressure can alter the stresses acting on the connection and compromise sealing performance.
Recommended corrective actions:
- Depressurize the system and disassemble the connection safely.
- Check whether the thread types are compatible.
- Reapply the appropriate sealing material according to the manufacturer’s instructions, or replace damaged sealing components.
- Inspect O-rings and sealing rings for signs of aging or damage.
- For connections exposed to substantial vibration, consider a suitable anti-loosening solution or a different connection type, such as a compression fitting or an appropriate thread-sealing method.
After repairing the connection, perform a pressurized leak test and observe it for an appropriate period to verify that the leakage does not return.
Q3: Is a Loose Tube Always Caused by a Faulty Fitting?
No. Check the tubing before concluding that the fitting is defective.
Several tubing-related problems can prevent a push-in fitting’s gripping collet from holding the tube securely:
- Incorrect outside diameter: Tubing that is undersized may not be gripped adequately.
- Damaged or unsuitable surface: Scratches, an excessively smooth surface for the fitting design, or oil contamination may affect gripping performance.
- Insufficient insertion depth: Tubing that has not been fully inserted may appear locked but can still come loose during operation.
- Poorly prepared tube ends: An angled cut or burrs may interfere with proper insertion and gripping.
After ruling out tubing-related problems, inspect the fitting’s collet. Repeated forceful pulling may deform the gripping mechanism or cause fatigue, reducing its ability to retain the tubing. If the collet is damaged or deformed, replace the fitting.
For equipment exposed to frequent or substantial vibration, consider using a suitable metal compression fitting instead of a push-in fitting where the application and tubing specifications permit. A correctly selected compression fitting may provide more reliable resistance to vibration-induced tube disconnection.
The recommended troubleshooting order is simple: check the tubing first, then inspect the fitting.
Q4: What Should I Do If Fittings Keep Leaking in High-Vibration Applications?
Vibration is a major challenge for pneumatic connections. It can accelerate wear of sealing rings in push-in fittings and contribute to loosening or deterioration at threaded and compression-type connections.
Consider the following measures:
1. Select a more suitable connection type.
For applications involving substantial vibration, consider a properly selected metal compression fitting or a threaded connection with an appropriate anti-loosening design. Confirm that the selected connection is compatible with the tubing, pressure, temperature, and other operating conditions.
2. Secure the tubing.
Install suitable tube clamps or supports to reduce movement and minimize the mechanical load transmitted to the fitting.
3. Review the thread-sealing method.
For threaded connections, an appropriate thread sealant may offer more durable sealing under vibration than PTFE tape in some applications. However, suitability depends on the thread design, materials, operating conditions, and manufacturer’s recommendations.
4. Increase inspection frequency.
Shorten the inspection interval for fittings installed in high-vibration areas so that wear, loosening, and leakage can be detected earlier.
After making changes, verify the connection under pressure and observe it during representative operating conditions, including vibration where applicable. Confirm the result through actual testing rather than assuming that the problem has been eliminated.
Q5: Should I Replace a Fitting If the Same Connection Keeps Leaking After Repeated Repairs?
Yes. If the same connection repeatedly leaks, the previous repairs may not have addressed the underlying cause. Repeatedly adding sealing tape or tightening the fitting further may only delay the next failure.
A more thorough inspection is necessary.
Step 1: Depressurize the system and disassemble the connection.
Follow the appropriate safety procedure before removing the fitting.
Step 2: Inspect the threads.
Check for cross-threading, damaged thread profiles, cracks, or expansion damage. Replace components with damaged threads rather than attempting to solve the problem by further tightening.
Step 3: Inspect the sealing components.
Check O-rings and sealing rings for aging, deformation, wear, or other damage. Replace defective components.
Step 4: Inspect the gripping mechanism.
For push-in fittings, check whether the collet is deformed or damaged. Replace the fitting if its gripping mechanism can no longer retain the tubing securely.
Step 5: Inspect the tubing contact surface.
Look for scratches, dents, contamination, or other damage that could prevent reliable sealing or gripping.
Replace damaged components rather than repeatedly repairing them without addressing the root cause.
If the connection operates under demanding conditions, such as substantial vibration, high temperature, or a corrosive environment, consider upgrading to a more suitable fitting type or material.
After replacement, install the connection according to the manufacturer’s instructions and perform a pressurized leak test. Connections that repeatedly leak should also be included in the equipment’s priority inspection checklist.
Technical Disclaimer
The fitting selection, thread types, and technical parameters discussed in this article are based on applicable international standards, including ISO 4414 (Pneumatic Fluid Power — General Rules and Safety Requirements), ISO 8573 (compressed air quality), ISO 6358 (flow characteristics), and relevant thread standards such as ISO 7-1, ISO 228-1, and ANSI/ASME B1.20.1, together with publicly available technical information from international manufacturers such as SMC, Festo, and Parker.
This article is intended for general technical reference only. Actual performance may be affected by cylinder bore size, load, operating pressure, temperature, piping layout, and other application-specific factors.
On-site testing and commissioning are recommended where necessary. Always refer to the product documentation and technical parameters confirmed by the manufacturer for the specific product being used.
LEANYEE Technical Team
More News & Insights
-
Leanyee
 29 Oct, 2026Pneumatics in Electronics CleanroomsPneumatics in Electronics and Semiconductor Cleanrooms: Cleanliness and ESD ProtectionRead Article
-
Leanyee
 22 Oct, 2026Pneumatics in Automotive Welding LinesPneumatics in Automotive Welding Lines: Clamping, Location, and Spatter ResistanceRead Article
-
Leanyee
 15 Oct, 2026Pneumatics for Food and Beverage LinesPneumatics on a Food and Beverage Line: Oil-Free, Hygienic, Washdown-ReadyRead Article