Installation Specifications for Pneumatic Fittings
Tightening Does Not Equal Sealing: How to Apply PTFE Tape, Control Tightening Torque, and Cut Pneumatic Tubing Correctly
-
10 Mar, 2025

-

Tightening Does Not Equal Sealing: How to Apply PTFE Tape, Control Tightening Torque, and Cut Pneumatic Tubing Correctly
LEANYEE Technical Guide · Pneumatic Systems Series
The Key Takeaway
In most cases, pneumatic fitting leaks occur because people assume that simply tightening a fitting is enough to create a reliable seal.
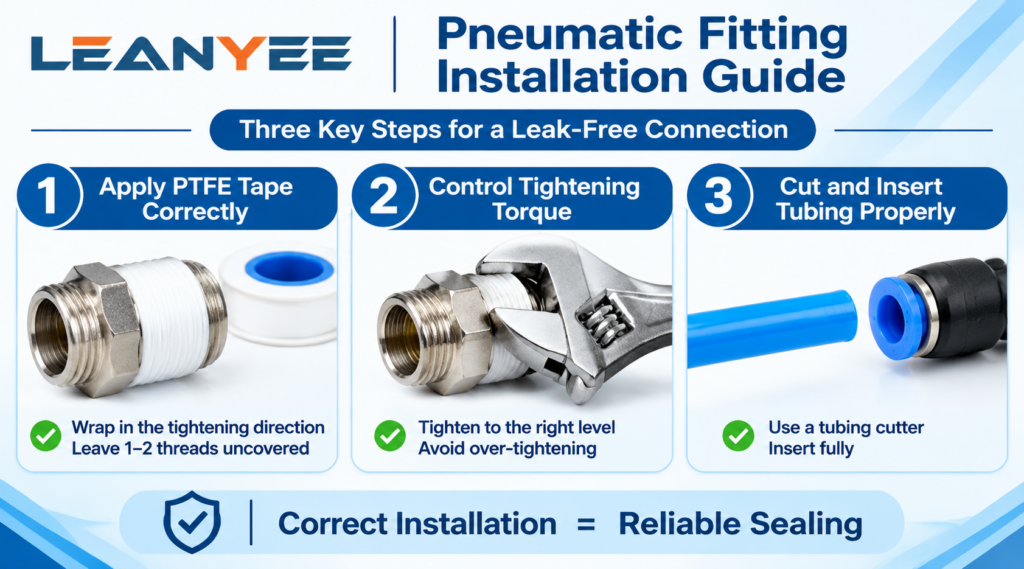
In reality, three actions determine whether a fitting seals properly:
- Apply PTFE thread seal tape correctly.
- Tighten the fitting to the appropriate torque.
- Cut the tubing squarely and insert it fully into the fitting.
Tightening does not automatically guarantee a seal. If the installation method is incorrect, tightening the fitting further may actually make the leak worse.
Understanding the Three Critical Installation Steps
1. Apply PTFE Thread Seal Tape Correctly
Tapered threads seal through the engagement of their tapered surfaces. PTFE thread seal tape, commonly known as Teflon tape, is used to help fill the gaps between the threads.
However, incorrect application can compromise sealing performance. Wrapping the tape in the wrong direction, allowing it to extend into the tube opening, or applying too many layers can cause sealing failure. Loose tape fragments may also enter the pneumatic circuit and potentially obstruct a valve.
2. Control Tightening Torque
Both excessive and insufficient tightening can cause problems.
- Excessive torque: May expand or crack the female threaded port, including a port in a pneumatic cylinder, and can damage the threads.
- Insufficient torque: May prevent the threads from engaging properly, resulting in inadequate sealing.
The goal is not to tighten the fitting as much as possible, but to achieve the appropriate level of tightening for the thread type and fitting design.
3. Cut and Insert the Tubing Correctly
Tubing that is cut at an angle or left with sharp burrs can damage the internal sealing ring of a push-in fitting. An uneven cut can also prevent the tubing from reaching the required insertion depth.
These problems may lead to air leakage, loose tubing, or tubing disconnection during operation.
Pneumatic fitting installation therefore requires the correct technique at every step. Even a small mistake can result in leakage.
For general safety requirements concerning pneumatic system installation and connections, refer to ISO 4414, where applicable.
Incorrect Installation vs. Correct Installation
| Installation Item | Incorrect Practice | Correct Practice |
|---|---|---|
| PTFE thread seal tape | Wrapping in the wrong direction, extending tape into the tube opening, or applying too many layers | Wrap in the tightening direction, leave the first 1–2 threads uncovered, and generally apply 3–6 wraps as appropriate |
| Tightening torque | Assuming tighter is always better, or overtightening until the threads are damaged | Tighten to the appropriate level according to the fitting design and manufacturer’s instructions |
| Tubing preparation | Bending tubing by hand, or using an angled cut with burrs | Use a tubing cutter to produce a square cut, then remove burrs |
| Tubing insertion depth | Inserting the tubing only partially | Push the tubing fully into the fitting until it reaches the required insertion depth; a click may be heard or felt on some designs, but this is not universal |
Knowing the Correct Technique Is Not Enough: Common Installation Pitfalls
Even when the basic installation procedure is understood, several common mistakes can still cause problems in the field.
1. Wrap PTFE Tape in the Tightening Direction
Always wrap PTFE thread seal tape in the direction in which the fitting will be tightened. For many right-hand threads, this means wrapping clockwise when viewed from the appropriate end.
Leave the first 1–2 threads uncovered near the fitting opening. This helps prevent loose tape fragments from entering the pneumatic circuit and potentially obstructing a valve.
2. More Tightening Torque Is Not Always Better
Excessive tightening force can expand or crack the fitting’s female thread or a cylinder port. Repairing a damaged threaded port can be much more troublesome than correcting an improperly installed fitting.
Apply the appropriate tightening torque for the fitting type, thread specification, and manufacturer’s installation requirements.
3. Always Use a Tubing Cutter
Use a dedicated tubing cutter rather than scissors, ordinary cutters that deform the tube, or manual bending and breaking.
An angled cut or sharp burrs can damage the internal sealing ring and create a hidden risk of slow air leakage. A clean, square cut helps ensure proper insertion and reliable sealing.
4. Perform a Leak Test After Installation
After installation, pressurize the system under appropriate and safe operating conditions and check for leaks.
A simple method is to apply soapy water to the connection and observe whether bubbles form. This helps identify the location of an air leak.
Do not assume that the installation is successful simply because the fitting appears secure. Always verify the seal before putting the equipment into normal operation.
Frequently Asked Questions (FAQ)
Q1: How Many Wraps of PTFE Tape Are Appropriate? What Happens If I Wrap It in the Wrong Direction?
For tapered pipe threads such as PT threads, 3–6 wraps of PTFE tape are a general starting point, depending on the thread size and profile. The appropriate amount should provide moderate resistance as the fitting is tightened. More tape does not necessarily mean better sealing.
Applying too much tape can increase the effective thread thickness and create excessive expansion stress, potentially damaging the female threaded component.
Wrap the tape in the tightening direction, generally clockwise for right-hand threads when viewed from the appropriate end. Start near the end of the male thread while leaving the first 1–2 threads uncovered. This reduces the risk of tape fragments entering the pneumatic circuit and obstructing the valve spool.
If the tape is wrapped in the wrong direction, it may loosen, bunch up, or become displaced as the fitting is tightened, compromising the seal.
After tightening, pressurize the system safely and use soapy water to check for leaks. The actual sealing performance must be verified through testing.
Q2: How Can I Control Tightening Without a Torque Wrench?
If a torque wrench is unavailable, the original guide suggests using a combination of tightening feel and a small adjustment method. However, there is no universal tightening angle or torque that applies to every fitting. The fitting manufacturer’s instructions should take priority.
For tapered threads, tighten the fitting until resistance becomes noticeable, then apply only the additional tightening required by the manufacturer’s guidance. Do not assume that the fitting must be tightened as far as possible. Excessive tightening can expand or crack the female thread or cylinder port.
The original guide also mentions slightly backing off the fitting by approximately 1/8 of a turn as a practical technique. This should not be treated as a universal rule: loosening a tapered-thread connection after tightening may compromise the seal, so follow the manufacturer’s instructions for the particular fitting.
For compression fittings, tighten the nut until the ferrule begins to grip the tubing, then apply the specified additional rotation. The required angle varies by manufacturer, fitting design, and tubing material.
For important connections or high-pressure applications, use a torque wrench or the manufacturer’s specified installation procedure whenever possible.
After installation, always perform a leak test under appropriate operating conditions.
Q3: What Happens If the Tubing Is Cut at an Angle?
An angled cut or burrs on the tubing can cause two major problems in a push-in pneumatic fitting.
First, the tubing may not reach the required insertion depth. The gripping teeth may engage unevenly, increasing the risk of the tubing becoming loose or disconnecting.
Second, sharp edges or burrs may damage the internal sealing ring. This can create a hidden defect that leads to slow air leakage over time.
For compression fittings, an angled cut can also cause uneven ferrule engagement and prevent the sealing surfaces from fitting together properly.
Always use a dedicated tubing cutter to make a square, clean cut. Remove internal and external burrs before installation.
Avoid using scissors that deform the tubing or breaking the tubing by hand. These shortcuts can result in repeated leakage and unnecessary maintenance work.
The quality of the tubing cut directly affects the sealing reliability and service life of the fitting.
Q4: Can Thread Sealant and PTFE Tape Be Used Together?
In most standard applications, using both is unnecessary. Choose the sealing method appropriate for the thread type, operating conditions, and manufacturer’s instructions.
- PTFE thread seal tape: Commonly used for conventional tapered-thread connections, particularly where disassembly may be required.
- Thread sealant, such as anaerobic sealant: Can provide reliable sealing and good vibration resistance when correctly selected and applied. It may require curing time, and the connection may need cleaning and reapplication after disassembly.
Combining tape and sealant does not necessarily improve sealing performance. Excessive sealing material can increase stress on the female thread or allow fragments to enter the pneumatic circuit.
For connections exposed to substantial vibration, higher pressure, or long periods of operation without maintenance, a suitable thread sealant may be worth considering, provided it is compatible with the connection materials and operating conditions.
Regardless of the method selected, follow the manufacturer’s instructions for application quantity and curing time, and perform a leak test after installation.
Q5: How Can I Install a Compression Fitting Without Cutting Into the Tubing?
A compression fitting seals by using a nut to drive a ferrule against the tubing, allowing the ferrule to grip the tube and create a seal.
To avoid damaging the tubing, follow these steps:
Step 1: Prepare the tubing.
Cut the tubing squarely and remove internal and external burrs. Confirm that the tubing has the correct outside diameter and is free from scratches, dents, and other damage.
Step 2: Tighten the nut correctly.
First, tighten the nut by hand. Then use a wrench to apply the additional rotation specified by the fitting manufacturer.
The required tightening angle varies among brands and fitting designs. Refer to the manufacturer’s product documentation rather than assuming that all compression fittings use the same procedure.
Step 3: Avoid overtightening.
Insufficient tightening may prevent the ferrule from gripping the tubing securely, resulting in leakage or tube movement.
Excessive tightening can cause the ferrule to cut into the tube wall, deform the tubing, or even cut through the tube.
Before tightening, you can mark the nut and fitting body to help monitor the amount of rotation.
Step 4: Inspect and test the connection.
After installation, pressurize the system under appropriate conditions and check for leakage.
If a compression fitting is disassembled and reused, inspect the ferrule for deformation or damage. Replace it if necessary, and follow the manufacturer’s instructions regarding whether the fitting can be reused.
Technical Disclaimer
The fitting selection, thread types, and technical parameters discussed in this article are based on applicable international standards, including ISO 4414 (Pneumatic Fluid Power — General Rules and Safety Requirements), ISO 8573 (compressed air quality), ISO 6358 (flow characteristics), and relevant thread standards such as ISO 7-1, ISO 228-1, and ANSI/ASME B1.20.1, together with publicly available technical information from international manufacturers such as SMC, Festo, and Parker.
This article is intended for general technical reference only. Actual performance may be affected by cylinder bore size, load, operating pressure, temperature, piping layout, and other application-specific factors.
Conduct on-site testing and commissioning where necessary. Always refer to the product documentation and technical parameters confirmed by the manufacturer for the specific product being used.
LEANYEE Technical Team
More News & Insights
-
Leanyee
 29 Oct, 2026Pneumatics in Electronics CleanroomsPneumatics in Electronics and Semiconductor Cleanrooms: Cleanliness and ESD ProtectionRead Article
-
Leanyee
 22 Oct, 2026Pneumatics in Automotive Welding LinesPneumatics in Automotive Welding Lines: Clamping, Location, and Spatter ResistanceRead Article
-
Leanyee
 15 Oct, 2026Pneumatics for Food and Beverage LinesPneumatics on a Food and Beverage Line: Oil-Free, Hygienic, Washdown-ReadyRead Article